
TL;DR:
- Early flat roof damage detection combines visual inspection with diagnostic technology to prevent costly failures. Regular inspections, especially after storms, and verification with infrared thermography and moisture meters are essential for accurate assessment. Addressing damage promptly, prioritizing flashings and drainage issues, and documenting findings ensure effective repair or replacement decisions.
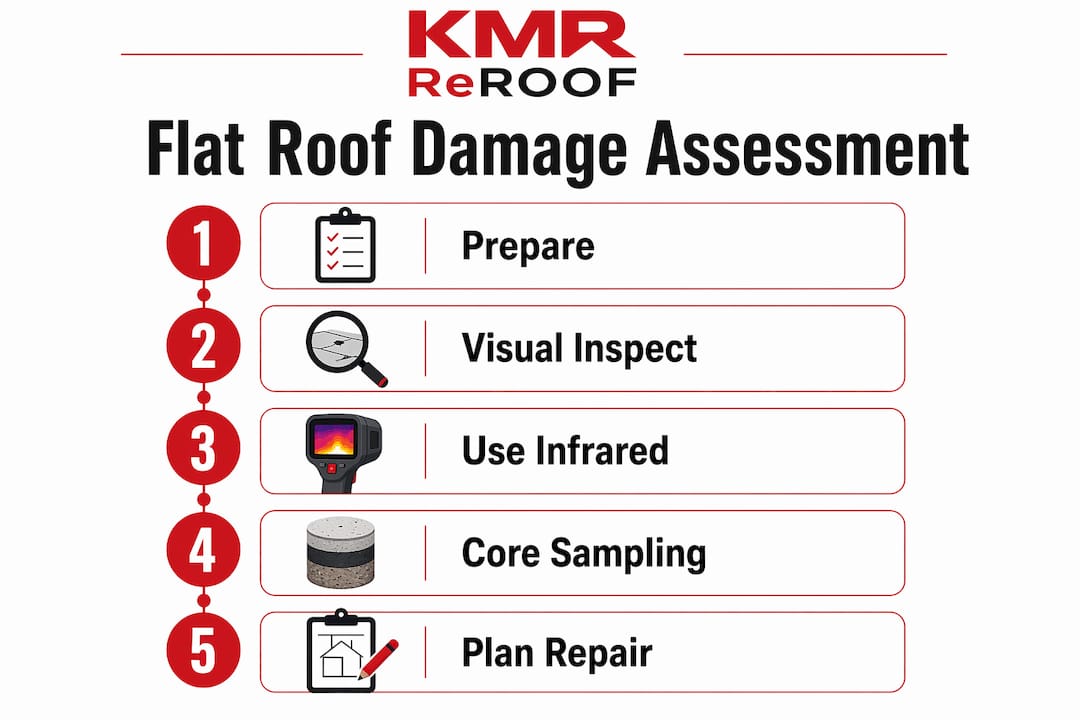
Flat roof damage assessment is the systematic process of combining visual inspection with diagnostic technology to identify surface defects, hidden moisture, and structural deterioration before they escalate into major failures. Property owners and facility managers who learn how to assess flat roof damage early can avoid the repair costs that come with undetected leaks, saturated insulation, and membrane breakdown. This guide covers the full flat roof inspection process, from the tools you need on day one to the decisions you make after the results come in.
How to assess flat roof damage before you climb up
Preparation determines the accuracy of your inspection. Arriving on a flat roof without the right tools means you will miss the damage that costs the most to fix later.
Your core inspection toolkit should include:
- Flashlight for examining shaded seams, drains, and low-clearance penetrations
- Moisture meter (impedance or pin-type) to quantify wet areas identified visually
- Infrared camera for scanning large membrane surfaces for temperature anomalies
- Probe tool or awl to test membrane firmness and detect soft spots in the substrate
- Camera or smartphone for timestamped photo documentation
- Inspection checklist to record findings systematically across every roof zone
Safety comes before any of this. Wear non-slip footwear, use a secured ladder, and never inspect a wet or icy roof surface alone. In Texas heat, schedule morning inspections to reduce surface temperature and fatigue.
| Inspection timing | Why it matters |
|---|---|
| Spring | Reveals winter freeze damage and seam stress |
| Fall | Prepares the roof for heavy rain season |
| After major storms | Catches impact damage and debris-blocked drains within 48 hours |
| Post-HVAC service | Identifies penetration disturbance around curbs and equipment bases |
Flat roof inspections should be conducted biannually, ideally in spring and fall, with additional checks after significant storms. Skipping the post-storm window is one of the most common and costly oversights a facility manager can make.
Pro Tip: Before stepping onto the roof, review the building’s maintenance history and any prior inspection reports. Knowing where previous repairs were made tells you exactly where to look first.
What to look for during a visual flat roof inspection
Visual inspection is the foundation of any flat roof inspection process. It does not require technology, but it does require a methodical approach. Walk the entire roof surface in a grid pattern so you cover every square foot without doubling back or missing zones.
Follow these steps in order:
-
Scan the membrane surface. Look for blistering, bubbling, cracking, discoloration, and punctures. Blisters indicate trapped air or moisture beneath the membrane. Cracks signal UV degradation or thermal cycling stress.
-
Examine seams and laps. Seams and laps are frequent leak origins; any lifting or separation requires immediate attention. Run your finger along every seam to feel for adhesive failure before it becomes visible.
-
Inspect all flashings. Flashings at HVAC curbs, skylights, pipe penetrations, and parapet walls are the highest-risk zones on any flat roof. Regular inspection of flashings at penetrations and parapets is critical because these are the most common failure points. Look for separation, rust staining, and cracked caulk.
-
Check drainage elements. Examine every drain, scupper, and gutter for debris blockage. Clogged drains are the leading cause of ponding water, which is the top cause of premature membrane failure on flat roofs. Clear any blockage and note whether the drain collar is sealed properly.
-
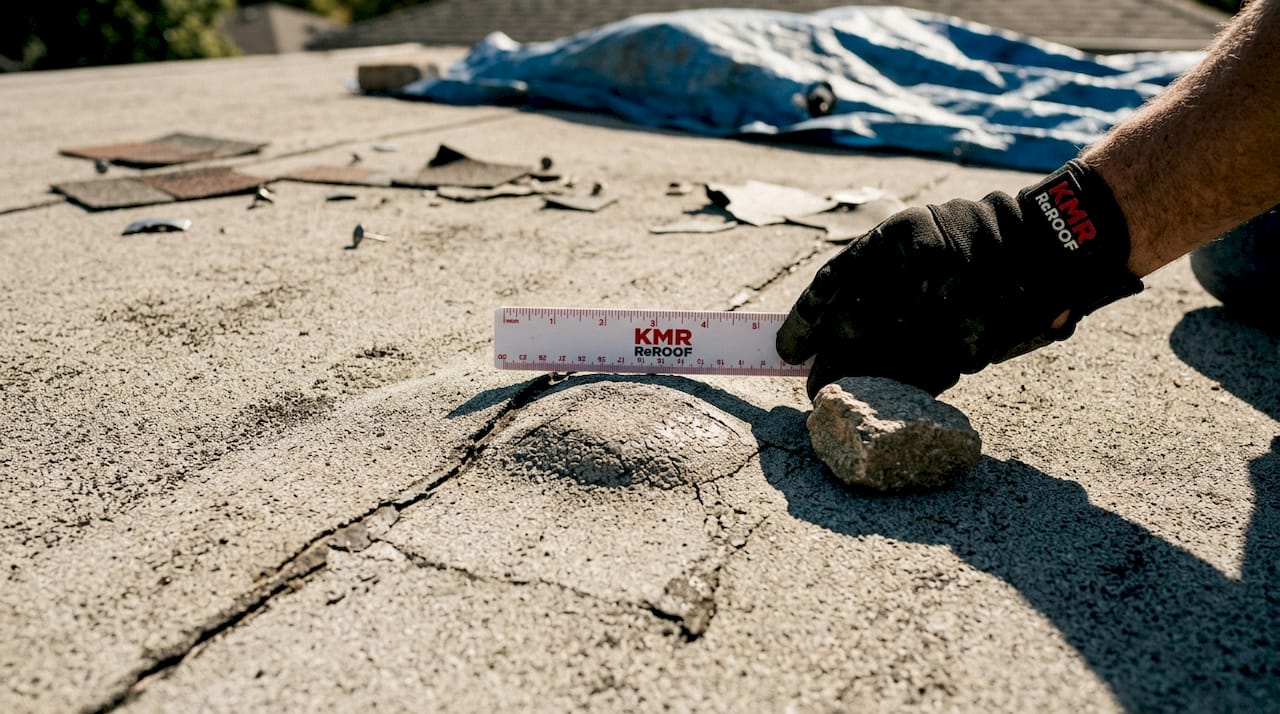
Test for soft spots. Walk slowly and press down with your foot at regular intervals. A spongy or deflecting surface indicates wet insulation or decking deterioration beneath the membrane. Mark these areas with chalk or tape for follow-up moisture testing.
-
Assess ponding water. Ponding water that remains for more than 48 hours is a primary threat, increasing structural load and accelerating membrane breakdown. Note the location, approximate depth, and whether the surrounding membrane shows discoloration or algae growth.
Pro Tip: Photograph every defect with a wide shot for context and a close-up for detail. Include a ruler or coin in close-up shots to give reviewers a sense of scale.
How does technology detect hidden moisture in flat roofs?
Visual inspection reveals surface damage, but the most expensive problems hide beneath the membrane. Wet insulation can exist for months without showing any visible sign above. This is where diagnostic technology changes the outcome of your assessment.
Infrared thermography works by detecting temperature differences across the roof surface. Wet insulation retains heat longer than dry insulation after sunset, creating a detectable thermal signature. Thermal cameras display relative moisture but must be paired with moisture meters and core sampling for quantitative verification per ASTM standards. An infrared scan alone is a map, not a diagnosis.
Moisture meters translate thermal findings into measurable data. The three main types serve different purposes:
- Impedance meters measure electrical resistance across the membrane surface without penetrating it, making them ideal for initial screening
- Pin-type meters insert probes into the substrate to measure moisture at specific depths, useful for confirming wet insulation
- Nuclear gauges emit low-level radiation to detect hydrogen atoms in water molecules, providing the most precise readings for large commercial roofs
Relying solely on infrared thermography without verification can lead to misclassification of wet areas due to heat sources unrelated to moisture. HVAC exhaust, mechanical vibration, and reflective surfaces all create false positives. Always verify with a moisture meter before marking an area as damaged.
Core sampling is the final confirmation step. A contractor cuts a small plug from the membrane to physically examine the insulation and decking beneath. Core sampling provides precise information about membrane, insulation, and decking condition but should be done carefully to avoid unnecessary disturbance. Each core sample is then patched and sealed.
| Technology | What it detects | Limitation |
|---|---|---|
| Infrared thermography | Temperature anomalies suggesting moisture | Requires verification; false positives possible |
| Impedance moisture meter | Surface and near-surface moisture | Limited depth penetration |
| Pin-type moisture meter | Moisture at specific substrate depths | Requires membrane penetration |
| Core sampling | Physical condition of all roof layers | Invasive; should be used selectively |
Pro Tip: Schedule infrared scans at dusk or within two hours after sunset. The temperature differential between wet and dry insulation is sharpest during this window, producing the clearest thermal images.
Common mistakes that undermine a flat roof assessment
Even experienced property managers make errors that compromise the accuracy of their assessments. Knowing these pitfalls in advance keeps your inspection results reliable.
-
Relying only on visual inspection. Surface cracks and blisters are visible, but saturated insulation is not. Skipping moisture meters or infrared scanning means you are making repair decisions without complete information.
-
Ignoring flashings and drain points. These are statistically the highest failure zones on flat roofs, yet they are often the last areas inspected. Spend proportionally more time at every penetration and parapet than on open field membrane.
-
Treating ponding water as normal. Standing water is not a cosmetic issue. Persistent ponding over 48 hours signals drainage defects that may require tapered insulation solutions rather than simple membrane repair. Dismissing it delays a fix that only gets more expensive.
-
Skipping post-storm assessments. The EPA recommends fixing water intrusion sources within 24 to 48 hours to prevent mold growth. A storm can open a seam or dislodge flashing in minutes. Waiting weeks to inspect means mold may already be established inside the building envelope.
-
Failing to document findings over time. A single inspection report is useful. A series of reports covering three or four inspection cycles is far more valuable. Trend data reveals whether damage is progressing, stabilizing, or responding to repairs. Without documentation, you are starting from zero every time.
For more on safe roof inspection steps specific to Texas properties, Misterreroof has published a practical guide covering both safety protocols and inspection methodology.
How to turn inspection results into a repair or replacement plan
Assessment findings are only useful if they lead to a decision. The data you collect from visual inspection, moisture meters, and core samples tells you one of three things: repair locally, repair extensively, or replace.
Follow this decision framework:
-
Calculate the damage percentage. Divide the total area of confirmed wet or damaged membrane by the total roof area. This single number drives the repair-versus-replace decision.
-
Check insulation condition. Dry insulation beneath a damaged membrane is repairable. Saturated insulation loses its thermal value and structural integrity. Less than 25% membrane damage with dry insulation usually warrants localized repairs; more extensive damage or saturated insulation often requires replacement.
-
Evaluate drainage capacity. If ponding water covers multiple zones and the roof slope is insufficient, patching membrane will not solve the underlying problem. Tapered insulation or drain relocation may be required as part of any repair scope.
-
Review the repair history. A roof that has been patched repeatedly in the same locations is telling you something. Chronic failures in the same zone indicate a systemic problem, not a maintenance gap.
-
Build a phased budget. Not every finding requires immediate action. Prioritize active leaks and structural soft spots in year one. Schedule seam reinforcement and flashing upgrades in year two. A phased approach spreads cost without deferring critical repairs.
| Finding | Recommended action |
|---|---|
| Under 25% damage, dry insulation | Localized membrane repair |
| 25% to 50% damage, partially wet insulation | Targeted replacement of affected sections |
| Over 50% damage or fully saturated insulation | Full roof replacement |
| Chronic ponding with inadequate slope | Tapered insulation system or drain addition |
Finding drainage and seal failures early drastically reduces repair costs and prevents insulation saturation. The cost difference between a localized repair and a full replacement can be significant, and the gap between them is often just one missed inspection cycle.
For a detailed look at your flat roofing material options before committing to a repair or replacement scope, comparing TPO, EPDM, and modified bitumen systems will help you choose the right solution for your building and climate.
Key takeaways
Accurate flat roof damage assessment requires combining systematic visual inspection with infrared thermography, moisture meters, and core sampling to detect both surface and hidden damage before it reaches replacement thresholds.
| Point | Details |
|---|---|
| Start with preparation | Gather moisture meters, an infrared camera, probe tools, and a checklist before stepping on the roof. |
| Inspect biannually and after storms | Spring, fall, and post-storm checks catch damage before it compounds. |
| Verify technology findings | Infrared scans require confirmation with moisture meters or core samples to avoid false positives. |
| Prioritize flashings and drains | These zones fail most often and cause the most damage when neglected. |
| Use damage percentage to decide | Under 25% damage with dry insulation means repair; over 50% or saturated insulation means replace. |
What I’ve learned from years of watching flat roofs fail
The most expensive flat roof failures I have seen share one thing in common: they were all visible at least one inspection cycle before they became catastrophic. A lifted seam at a parapet wall. A drain collar that had separated slightly. A soft spot the size of a dinner plate near an HVAC curb. None of these are dramatic. All of them become dramatic when they are ignored for another six months.
The technology argument is real but often misapplied. Infrared thermography is a powerful tool, and moisture surveys combining infrared, nuclear, and impedance scanning must be calibrated and verified according to standards to produce accurate results. But I have seen property managers use an infrared scan as a substitute for a thorough visual walkthrough rather than a complement to it. That is backwards. Walk the roof first. Use the technology to confirm what you suspect, not to replace the judgment you develop by being on the surface.
Drainage is the issue that gets deferred most often, and it is the one that costs the most when it does. A ponding problem that requires tapered insulation is a real expense. But it is a fraction of the cost of replacing a roof that failed because standing water sat on the membrane through three Texas summers. The math is not complicated. The discipline to act on it is the hard part.
My recommendation: treat your flat roof like a piece of mechanical equipment. Schedule it. Document it. Act on the findings. A roof that gets two professional inspections per year and prompt attention to minor defects will outlast one that gets inspected only when something leaks.
— Misterreroof
Get a professional flat roof assessment from Misterreroof

A thorough flat roof assessment requires more than a visual walkthrough. Misterreroof brings licensed roofing professionals to El Campo and Houston, TX properties with the full diagnostic toolkit: infrared thermography, impedance moisture meters, and core sampling to confirm what the surface cannot show you. Every inspection produces a documented report with photo evidence, moisture mapping, and a clear repair-versus-replace recommendation. Whether you are managing a commercial facility or protecting a residential flat roof, Misterreroof delivers the accuracy you need to make confident decisions. Explore flat roof replacement options or review the Texas homeowner replacement guide to understand your next steps.
FAQ
How often should a flat roof be inspected?
Flat roof inspections should be conducted biannually, in spring and fall, with additional checks after major storms. This schedule catches seasonal damage early and keeps most warranties valid.
What are the most common signs of flat roof damage?
The most common signs include membrane blistering, cracked or lifted seams, separated flashings at penetrations, clogged drains, and ponding water that persists beyond 48 hours. Soft spots underfoot indicate wet insulation or decking deterioration beneath the surface.
Can I assess flat roof damage myself or do I need a contractor?
A basic visual inspection is something any property owner can conduct with the right checklist and safety precautions. However, detecting hidden moisture requires infrared cameras and moisture meters that most owners do not own, making a professional inspection necessary for a complete picture. For guidance on hiring the right contractor, a structured checklist helps you ask the right questions before committing.
How do I know if my flat roof needs repair or full replacement?
Less than 25% membrane damage with dry insulation typically supports localized repair. Damage exceeding 50% of the membrane area or saturated insulation throughout the roof system makes replacement the more cost-effective choice.
How quickly should I act after finding flat roof damage?
Act within 24 to 48 hours for any active water intrusion. The EPA recommends addressing moisture sources promptly to prevent mold growth, which can begin within 24 hours of sustained moisture exposure inside a building envelope.
