
TL;DR:
- Roof hail damage causes impact injuries such as granule loss, bruising, and dents on roofing materials. Early identification through tactile tests, collateral damage, and systematic inspections improves insurance claim success. Proper documentation and professional assessments are essential to accurately evaluate and address roof hail damage.
Roof hail damage is defined as physical impact injury to roofing materials caused by hailstones, most commonly appearing as granule loss, bruising, and cracking on asphalt shingles or dents on metal surfaces. Knowing how to identify roof hail damage early is the difference between a straightforward insurance claim and a costly repair you fund out of pocket. Texas homeowners face some of the most active hail corridors in the country, with the Houston and El Campo areas seeing repeated severe storms each year. The key signs of roof hail damage include random dark circular bruises on shingles, exposed black asphalt mat beneath missing granules, and dents on gutters, vents, and flashing. Tools like binoculars, carpenter’s chalk, and a chalk line make the inspection process far more accurate than a naked-eye scan from the driveway.
How to identify roof hail damage: key signs by material
The most reliable way to spot hail damage starts with knowing what it looks like on your specific roofing material. Asphalt shingles and metal roofs each show damage differently, and confusing one for the other leads to missed claims or unnecessary repairs.
Asphalt shingles: what hail actually does
Hail impact on asphalt shingles produces random circular bruises with granule loss that exposes the dark asphalt mat underneath. These spots look like small bullseyes scattered across the shingle surface with no consistent pattern. The randomness is the tell. Aging wear and foot traffic damage follow predictable lines and edges, while hail hits land wherever the storm sends them.
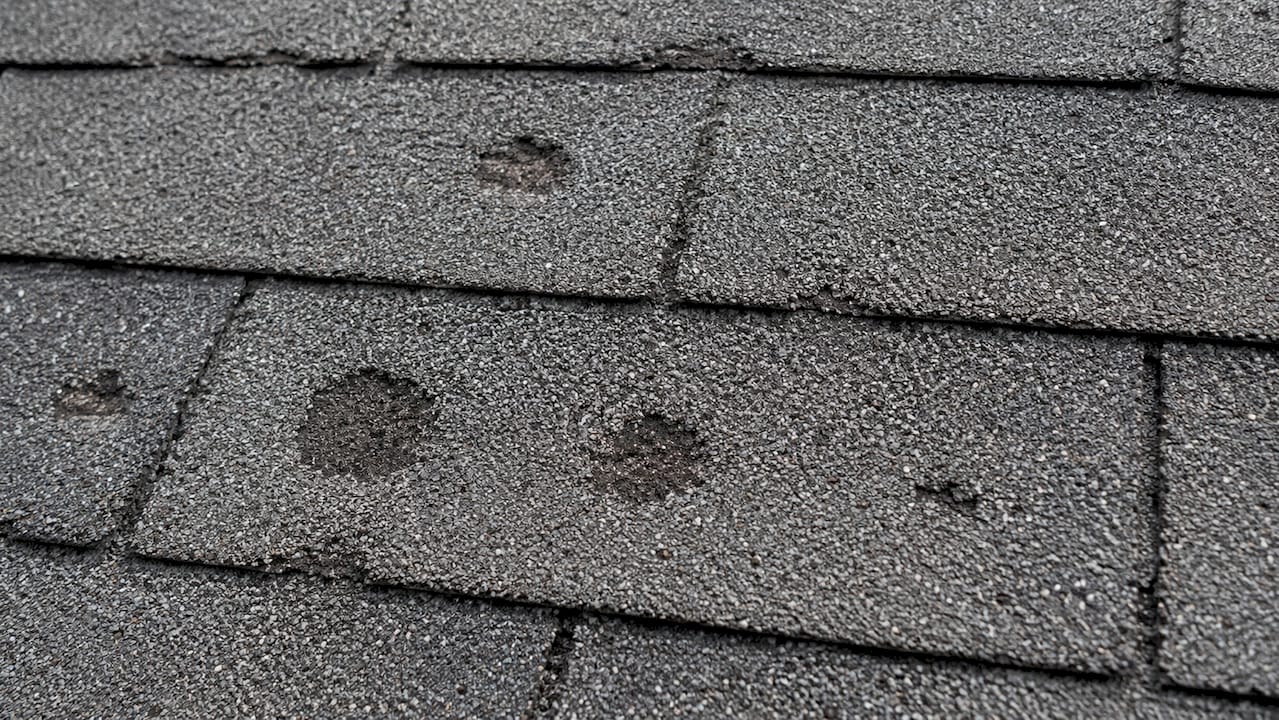
The most reliable field test for true hail damage is the thumb press. Real hail bruises feel soft or spongy when you press them, while aging spots, blistering, and manufacturing defects feel firm. This single test eliminates most false positives. If a dark spot does not give under moderate thumb pressure, it is likely cosmetic and not a functional hail bruise.
Pro Tip: Inspect shingles in the morning when temperatures are cooler. Heat softens all shingles slightly, which can make aging spots feel softer than they actually are and skew your tactile test results.
Metal roofs and collateral damage
Metal roofs show hail damage as dents, dings, and scratches, often with paint scuffing around the impact point. Fasteners can loosen under repeated hail impact, creating entry points for water even when the metal panel itself looks intact. Beyond the roof surface, check gutters, downspouts, window screens, HVAC condenser fins, and painted wood trim. Dents on soft metals like gutters and vents confirm that hail hit your property with enough force to damage roofing materials above. Insurance adjusters treat collateral dents as corroborating evidence. Without them, a claim based only on shingle marks faces more scrutiny.
- Random dark spots with granule loss on asphalt shingles
- Soft, spongy feel when pressing suspected bruise areas
- Dents and scratches on metal panels and exposed fasteners
- Dings on gutters, downspouts, vents, and flashing
- Bent or crushed HVAC condenser fins
- Granule accumulation in gutters after a storm
How to check your roof for damage without climbing up
Starting from the ground using binoculars is the safest and most practical first step for any roof hail damage inspection. A wet or recently hailed roof is slippery and structurally unpredictable. You can gather significant evidence before ever considering roof access.
- Scan the roof slopes with binoculars. Stand at multiple angles around your home. Look for dark circular spots, missing granule patches, and any shingles that appear lifted or cracked. A window on an upper floor gives you a better sightline to lower slopes.
- Inspect gutters and downspouts. Look for dents along the gutter body and check downspout outlets for granule accumulation. Granules in gutters after a storm are a strong indicator that shingles took impact hits.
- Check all soft metal surfaces. Walk the perimeter and examine window sills, flashing, vents, and the HVAC unit. Dents here confirm hail size and force.
- Photograph everything at ground level. Date-stamp your photos immediately. This establishes a timeline that supports your insurance claim even before a professional inspection.
- Note the storm date and any weather service reports. The National Weather Service and services like Verisk’s Xactimate platform track hail events by zip code. This data strengthens your documentation.
Pro Tip: Check your window screens. Hail punches small circular holes in aluminum screens, and the pattern of holes can even indicate hail size. Screens are cheap to replace but expensive to ignore as evidence.
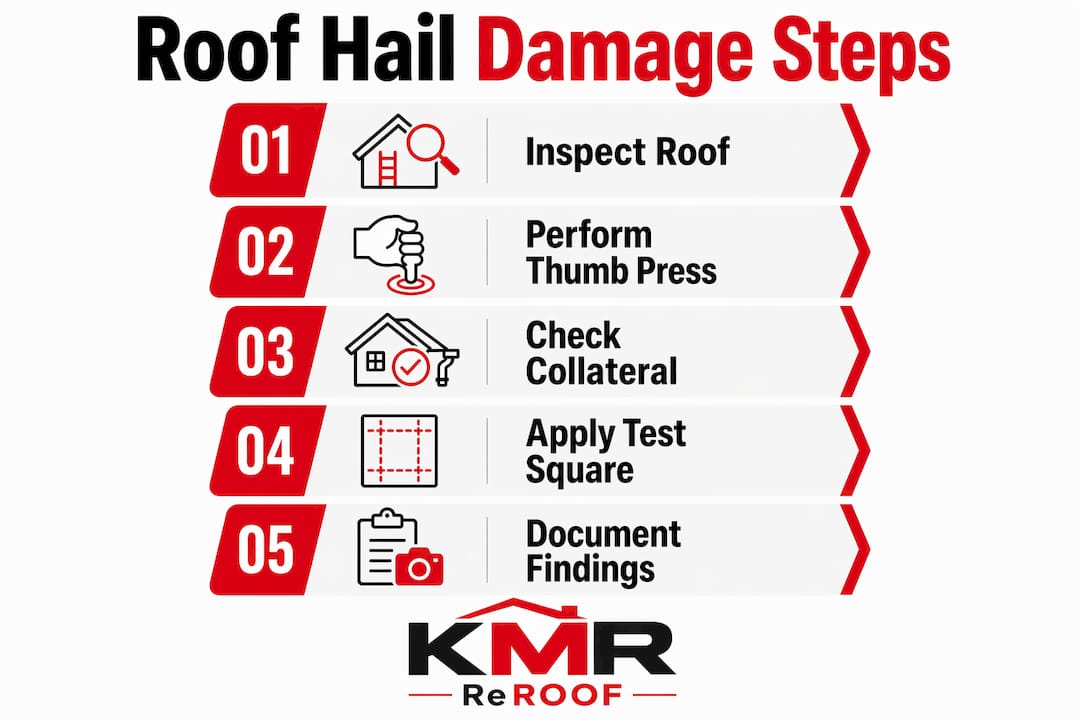
What is the test square method for roof inspection?
The test square method is the standard professional technique for quantifying hail damage severity on a roof surface. It involves marking a 10 ft x 10 ft area on each slope and counting the number of functional hail bruises within that square. Eight or more hits per test square on a single slope typically signals that the slope needs full replacement rather than spot repair.
Here is how to apply the method if you choose to access your roof safely:
- Gather your tools. You need carpenter’s chalk, a chalk line, a tape measure, binoculars, rubber-soled shoes, and a safety harness if your roof pitch exceeds 4:12.
- Mark your test square. Snap chalk lines to create a 10 ft x 10 ft grid on one slope. Start near the ridge where foot traffic is less likely to have caused cosmetic marks.
- Count only functional bruises. A functional bruise shows granule loss, a soft center, and often a concentric impact ring. Functional damage differs from cosmetic loss in that it cracks the underlying mat and creates a path for water intrusion.
- Repeat on every slope. Hail does not hit all sides of a roof equally. A north slope may show far more damage than a south slope depending on storm direction. Sample at least two squares per slope.
- Record your counts. Write down the slope, square location, and bruise count. This data becomes part of your claim documentation.
| Slope | Test Square Location | Bruise Count | Assessment |
|---|---|---|---|
| South | Near ridge, center | 4 | Monitor, possible cosmetic |
| North | Mid-slope, left | 11 | Replacement likely needed |
| East | Near ridge, center | 7 | Borderline, retest advised |
| West | Mid-slope, right | 9 | Replacement likely needed |
Relying on a single test square produces inaccurate conclusions because storm variability means one area of a slope can look fine while another is severely impacted. Multiple samples across all slopes give a credible, defensible picture of total damage.
How to document hail damage for an insurance claim
Proper documentation is what separates a paid claim from a denied one. Water intrusion from hail bruises often begins 6–18 months after initial impact, which means your roof can look fine from the street while quietly failing underneath. Document before the leak appears.
- Take clear, close-up photos of every bruise, crack, and granule-loss patch. Include a coin or ruler in the frame for scale.
- Photograph all collateral dents on gutters, vents, flashing, and the HVAC unit. Collateral damage on soft metals is a key factor in claim approvals.
- Collect granules from gutters in a zip-lock bag and label them with the date. Physical evidence supports your timeline.
- Save any weather alerts, radar screenshots, or National Weather Service reports tied to the storm date.
- Contact a licensed, insured roofing contractor before your adjuster visit. Having a contractor present during the adjuster’s inspection helps clarify which marks count as functional hail bruises in real time.
Common mistakes that hurt your hail damage assessment
The biggest mistake Texas homeowners make is treating a ground-level scan as a complete roof hail damage inspection. Many hail impacts are not visible from the street. Granule loss on low-slope sections and bruising near the ridge require close-up access to detect.
A second common error is confusing blistering with hail bruising. Blistering appears as raised bubbles caused by manufacturing defects or poor ventilation. It feels firm, not spongy, and follows no impact pattern. Aging wear produces uniform granule thinning across entire shingle fields, not random circular spots. Mechanical damage from foot traffic leaves scuff marks along straight paths, not scattered bullseyes.
“Inspection disputes often hinge on confirming whether dark spots are true functional bruises versus surface scuffs or dirt. Consistent tactile testing and correlating collateral dents reduce disputes significantly.” — Owl Roofing
Timing matters too. Coordinating your contractor and adjuster for a joint inspection eliminates back-and-forth disputes over which marks qualify. If an adjuster visits without a roofing professional present, borderline bruises often get dismissed. A knowledgeable contractor can point to the soft center, the granule loss pattern, and the collateral dents in one walk-through.
Key takeaways
Accurate hail damage identification requires combining tactile testing, collateral damage verification, and systematic test square counts across all roof slopes.
| Point | Details |
|---|---|
| Tactile bruise testing | Press suspected spots; real hail bruises feel soft and spongy, not firm like aging or blistering. |
| Collateral damage confirms impact | Dents on gutters, vents, and HVAC fins prove hail force and strengthen insurance claims. |
| Test squares quantify severity | Count functional bruises in 10 ft x 10 ft grids; 8+ hits per square typically warrants slope replacement. |
| Document before leaks appear | Water intrusion can begin 6–18 months post-impact, so photograph and record damage immediately after a storm. |
| Professional inspection reduces disputes | A contractor present during adjuster visits clarifies functional bruises and improves claim outcomes. |
What i’ve learned watching homeowners miss real damage
The most common scenario I see is a homeowner who walks the perimeter after a storm, spots no obvious missing shingles, and concludes the roof is fine. Three months later, a ceiling stain appears. By then, the insurance window may be tightening and the documentation is gone.
Real hail damage is subtle. The bruises that matter most are not the dramatic cracks you can spot from the driveway. They are the soft, quarter-sized depressions near the ridge that only reveal themselves under thumb pressure. I have watched adjusters dismiss legitimate claims because the homeowner had no collateral damage photos, no granule samples, and no contractor present to advocate for them.
The tactile test is the most underused tool in a homeowner’s inspection kit. It costs nothing and takes seconds. Yet most people skip it because they do not know it exists. Pair that with a thorough check of your gutters and HVAC unit, and you have already built a stronger case than most homeowners bring to their adjuster.
My honest advice: treat every hail event as a claim-worthy event until you can prove otherwise. Document first, conclude later. A Texas roof inspection checklist keeps you organized and ensures you do not skip the collateral damage steps that adjusters rely on most.
— Misterreroof
Protect your texas home after a hail storm
If your inspection turns up bruising, granule loss, or collateral dents, the next step is getting a professional assessment before your insurance window closes. Misterreroof serves homeowners across El Campo and Houston, TX, with expert roof inspections and full replacement services built for Texas weather conditions.

The Texas roof replacement guide from Misterreroof walks you through what to expect after a hail event, from inspection to final installation. If you are in the Houston area, the Houston homeowner replacement tips cover material selection, contractor vetting, and insurance coordination specific to your market. Contact Mister Reroof today for a free estimate and get a roofing team on your side before the next storm season.
FAQ
What does hail damage look like on asphalt shingles?
Hail damage on asphalt shingles appears as random, circular dark spots where granules have been knocked away, exposing the black asphalt mat beneath. The spots often have a soft, spongy feel when pressed, which distinguishes them from aging or blistering.
How do i check my roof for hail damage safely?
Start from the ground using binoculars to scan roof slopes, then check gutters, vents, and the HVAC unit for dents before considering roof access. Professional inspections are recommended for any damage that is subtle or ambiguous.
How many hail hits indicate i need a roof replacement?
The test square method counts bruises in a 10 ft x 10 ft area; eight or more functional hits per square on a slope typically signals that full slope replacement is needed rather than spot repairs.
Why does collateral damage matter for my insurance claim?
Dents on gutters, vents, and flashing confirm that hail struck your property with enough force to damage roofing materials. Adjusters treat the absence of collateral dents as a reason to question shingle damage claims.
How soon should i document hail damage after a storm?
Document damage immediately after a storm because water intrusion from hail bruises can begin 6–18 months after impact, and delayed documentation weakens your insurance claim timeline.
